리액트 2주차 과제


기능
1주차에서 만들었던 TIL 리스트를 TIL을 추가하는 /write 화면과 TIL 리스트가 보여지는 메인화면으로 나누어서 구현해보자.
이 때 /write 추가하기를 누르면 / 에도 추가되도록 리덕스로 붙여넣는다.
/ 에서 추가를 누르면 /write 으로 이동되도록 만든다.
구현
index.js에서 BrowserRouter 를 불러와서 App 컴포넌트를 감싸준다.
import { BrowserRouter } from "react-router-dom";

const root = ReactDOM.createRoot(document.getElementById("root"));
root.render(
    <BrowserRouter>
        <App />
    </BrowserRouter>
);
App.js에서 경로에 따라 보여질 화면을 라우팅 처리해준다.
import { Routes, Route } from "react-router-dom";
import Main from "./pages/Main";
import Write from "./pages/Write";

function App() {
	...
    return (
        <div className="App">
			...
            <Routes>
                <Route path="/" element={<Main tilList={tilList} />}></Route>
                <Route path="/write" element={<Write />}></Route>
            </Routes>
        </div>
    );
}

export default App;
그리고 각 TIL 추가할 때 기능들을 Write 컴포넌트에 알맞게 옮겨준다. 리덕스 툴킷을 이용해서 관리해보자.
우선 index.js 에서 <Provider> 로 감싸주고 store 를 만들어서 주입해주어야 한다.
// index.js
...
import { Provider } from "react-redux";
import { store } from "./store/index";

const root = ReactDOM.createRoot(document.getElementById("root"));
root.render(
    <Provider store={store}>
        <BrowserRouter>
            <App />
        </BrowserRouter>
    </Provider>
);
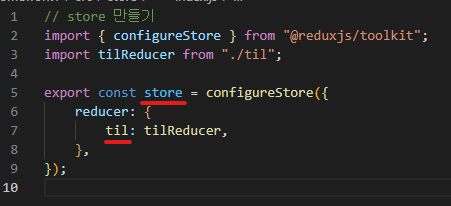
// /store/index.js store 만들기
import { configureStore } from "@reduxjs/toolkit";
import tilReducer from "./til"; // export default 로 내보낸 경우 import 할 때 이름은 마음대로

export const store = configureStore({
    reducer: {
        til: tilReducer,
    },
});
// til.js 슬라이스 만들기
import { createSlice } from "@reduxjs/toolkit";
const tilSlice = createSlice({
name: "til",
initialState: {
tilList: [],
},
reducers: {
add: (state, action) => {
console.log(action);
// 어떤 변경 작업을 해!
},
},
});
export const { add } = tilSlice.actions;
export default tilSlice.reducer;주입완료!
이제 주입해주었으니 나머지 기존에 작업해주었던 Main.js 와 Write.js 의 기능들을 수정해보자.
Main.js
// 수정 전 Main.js -- props 로 tilList를 넘겨받는 중
import React from "react";
import { useNavigate } from "react-router-dom";

const Main = ({ tilList }) => {
    const navigate = useNavigate();

    return (
        <div className="til-list" style={{ width: "60vmin", margin: "auto" }}>
            <div
                className="title-area"
                style={{
                    borderBottom: "1px solid #ccc",
                    display: "flex",
                    justifyContent: "space-between",
                }}
            >
                <h1>TIL</h1>
                <button
                    onClick={() => {
                        navigate("/write");
                    }}
                    style={{
                        borderRadius: "50px",
                        border: "none",
                        backgroundColor: "#0e3d62",
                        color: "#fff",
                        width: "70px",
                        height: "70px",
                        cursor: "pointer",
                        margin: "auto 0",
                    }}
                >
                    추가
                </button>
            </div>

            {tilList.map((til, idx) => {
                return (
                    <div
                        className="til-item"
                        key={idx}
                        style={{
                            border: "1px solid #eee",
                            padding: "20px",
                            margin: "15px",
                            textAlign: "left",
                        }}
                    >
                        <b>{til.title}</b>
                        <p>{til.content}</p>
                        <p>{til.time}</p>
                    </div>
                );
            })}
        </div>
    );
};

export default Main;
useSelector 를 이용해서 store 에서 리스트를 넘겨 받아올 수 있도록 했다.
// Main.js
...
import { useSelector } from "react-redux";

const Main = () => {
    const navigate = useNavigate();
    const tilList = useSelector((store) => store.til.tilList);
	...
useSelector 를 통해 접근한 데이터는 다음과 같다.

Write.js
// 수정 전 Write.js -- props 로 tilList와 setTilList 받아오는 중
import React from "react";
import { useNavigate } from "react-router-dom";

const Write = ({ tilList = [], setTilList }) => {
    const navigate = useNavigate();
    const title_ref = React.useRef(null);
    const content_ref = React.useRef(null);
    const time_ref = React.useRef(null);

    const addTIL = () => {
        const tilData = {
            title: title_ref.current.value,
            content: content_ref.current.value,
            time: time_ref.current.value,
        };
        setTilList([...tilList, tilData]);
        alert("추가되었습니다!");
        title_ref.current.value = "";
        content_ref.current.value = "";
        time_ref.current.value = "";
    };

    return (
        <div
            className="input-area"
            style={{
                display: "flex",
                gap: "1rem",
                flexDirection: "column",
            }}
        >
            <button
                onClick={() => {
                    navigate("/");
                }}
                style={{
                    width: "100px",
                    height: "50px",
                    border: "none",
                    borderRadius: "50px",
                    backgroundColor: "#0e3d62",
                    color: "#fff",
                    cursor: "pointer",
                    margin: "auto",
                }}
            >
                홈으로 가기
            </button>
            <div>
                <span>과목</span>
                <input ref={title_ref} />
            </div>
            <div>
                <span>내용</span>
                <input ref={content_ref} />
            </div>
            <div>
                <span>공부시간</span>
                <input ref={time_ref} />
            </div>
            <button
                style={{
                    border: "none",
                    borderRadius: "4px",
                    padding: "10px",
                    background: "skyblue",
                    color: "#fff",
                    cursor: "pointer",
                }}
                onClick={addTIL}
            >
                추가하기
            </button>
        </div>
    );
};

export default Write;
write 의 경우 액션을 디스패치 해주어야 한다. 사용하기 위한 액션함수를 가져온다.
import React from "react";
import { useNavigate } from "react-router-dom";
import { add } from "../store/til";
import { useDispatch } from "react-redux";

const Write = () => {
	...
    const dispatch = useDispatch(); // 디스패치

    const addTIL = () => {
        const tilData = {
            title: title_ref.current.value,
            content: content_ref.current.value,
            time: time_ref.current.value,
        };
        // setTilList([...tilList, tilData]);
        dispatch(add(tilData)); // add 하고 tilData 를 넘겨주었다.
		...
dispatch 를 통해서 add에 tilData 를 넘겨주었고, add 액션함수에서 console.log(action) 액션객체를 찍어보면 다음과 같이 확인할 수 있다.

action.payload 에 우리가 입력하려는 데이터가 담겨있는 것을 확인했으니, 우리는 리덕스 툴킷을 사용중이므로 immer 가 내장되어 있기 때문에 불변성 고려할 필요 없이 바로 직접 수정으로 tilList에 추가해주면 된다.
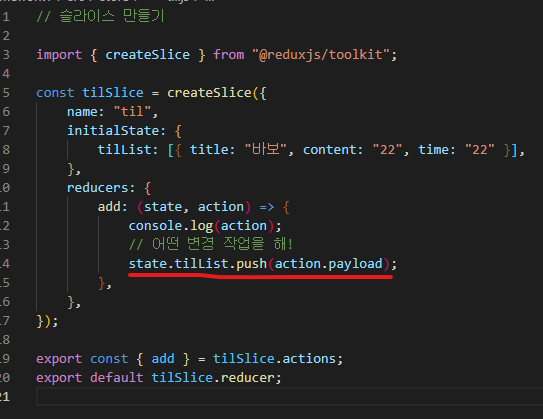
// til.js
// 슬라이스 만들기

import { createSlice } from "@reduxjs/toolkit";

const tilSlice = createSlice({
    name: "til",
    initialState: {
        tilList: [{ title: "바보", content: "22", time: "22" }],
    },
    reducers: {
        add: (state, action) => {
            console.log(action);
            // 어떤 변경 작업을 해!
            state.tilList.push(action.payload);
        },
    },
});

export const { add } = tilSlice.actions;
export default tilSlice.reducer;
💡추가 팁
useNavigate 값으로 -1 을 주면 이전 페이지로 돌아간다!
 // Write.js -- 추가하고 바로 뒤로가기로 해서 추가한 TilList 를 볼 수 있도록 하면 굿
    ...
    const addTIL = () => {
        const tilData = {
            title: title_ref.current.value,
            content: content_ref.current.value,
            time: time_ref.current.value,
        };
        // setTilList([...tilList, tilData]);
        dispatch(add(tilData)); // add 하고 tilData 를 넘겨주었다.
        navigate(-1);